How to Prepare and Patch a Rubber Roof
Step One — What Products Can’t Be Applied On My Rubber Roofing?
EPDM roofing techniques, which are sometimes termed as rubber roofs, can be a very common choice for very low sloped roofing installation for residential apps. They are expected to have an extended service daily life with a life expectancy of 15 to 2 decades for most applications and designs. They are safer to install when compared to modified roof systems that require the use of an open flame torch or hot asphalt to adhere the roof system. In addition, they are easy to maintain and repair in the event that a leak occurs or the roof surface is damaged.
Two of the most important aspects of repairing and maintaining an EPDM roof system on your home are the selection of the correct repair materials and the proper preparation of the area to be repaired. Using improper materials or methods to repair and maintain your EPDM roof system can lead to damages to the roof membrane as well as a reduced life expectancy and premature failure of the roof system. Always remember that if you do not feel comfortable doing it yourself contact a professional team like ABC roofing.
What Products Can’t Be Used On My Rubber Roof?
When choosing your materials to complete the repair to your EPDM roof system it may be easiest to explain the type of materials that you should not use. EPDM roofing membrane is a synthetic rubber membrane. EPDM, or rubber, is not compatible with asphalt based products. This includes any type of roof cement flashing as well as any type of asphalt based roof coating including aluminum roof coating. These types of products should not be used to maintain or repair an EPDM roof membrane system.
If asphalt products are used for repair or maintenance on EPDM roof systems, the contaminated membrane will be required to be cut out and replaced. If the extent of the contamination is widespread, this may require the roof system to be replaced. Once the roof membrane is contaminated, the removal of the contamination is difficult and the replacement of the membrane becomes necessary.
Step Two — Roof Repair Patch Preparation
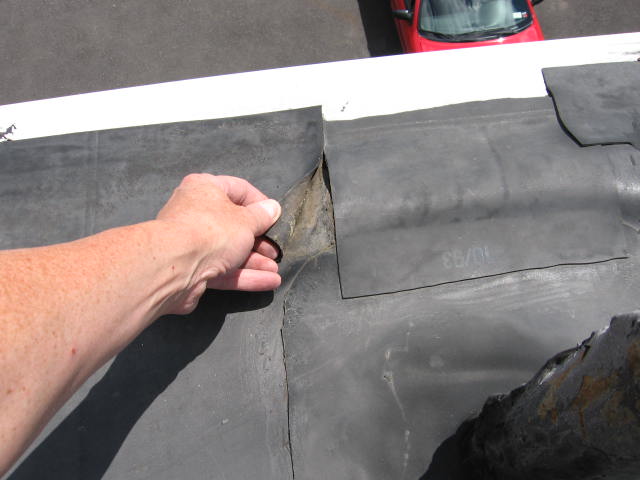
The next step in repairing your EPDM roof system is to properly prepare the roof surface to receive the patch. EPDM has carbon contained within the membrane. As the membrane ages the sheet begins to develop a carbon film on the surface of the sheet. This is evidenced by rubbing your hand across the sheet. If it is black EPDM, you will have carbon black on the surface of your hand. This carbon black film as well as dirt and other oxidation must be cleaned from the surface of the sheet to allow the patch to stick to the surface of the roof membrane.
Clean the Roof Repair Area
In order to clean the surface of the roof use a cleaner that does not leave a residue on the membrane after the area dries. Many manufacturers recommend a cleaner such as Simple Green or Spic n’ Span. Wash the area of the roof where the patch is to be applied to a size greater than the size of the patch to be applied. Use cloth rags to scrub the surface of the membrane to remove the oxidation from the surface of the EPDM. After the oxidation has been removed, wipe the surface of the area down to remove all traces of moisture from the patch area.
It is important that the oxidation, dirt and carbon black are removed from the surface of the roof. If they are allowed to remain, any new patch or adhesive used for the patch will stick to the film on the roof surface and not to the membrane causing the patch to be compromised. Cleaning the roof surface properly will allow the patch to adhere directly to the membrane, improving its long-term performance.
Step Three — Sizing and Cutting of the Roof Repair Patch
It is best to measure the roof repair patch prior to applying the primer. In order to measure the patch, take the material and lay it over the area to be patched. Allow the patch material to extend past the area where the repair is required. It is best to have a minimum of two inches in all directions from the leading edge of the cause of the roof problem being repaired. Once you have laid out the patch, cut the roof repair material to fit. It is recommended to clip or round the corners of the patch to avoid any sharp corners that can be lifted and caught by foot traffic on the roof surface.
Step Four — Priming the Roof Repair Area
The next step in applying the patch after properly cleaning the roof surface is to apply a thin coat of primer to the membrane surface. When applying the primer use a paint roller with a medium knap roller cover or paint brush to apply a thin coat of primer to the area where the patch is to be applied. When applying the primer, ensure that it extends past all edges of where the patch is to be applied. This will ensure that all leading edges of the EPDM patch are properly adhered to the roof membrane.
Step Five — Installation of the Roof Repair Patch
Repair materials are sold in either standard membrane materials, which require separate adhesive, or pressure-sensitive materials which have the adhesive pre-applied to the underside of the membrane.
Pressure-Sensitive Roof Repair Patch
Remove the paper or film backing from the patch and apply the patch to the surface of the roof system if you are using a pressure-sensitive roof repair material. Press the patch firmly in place. It is best to use a steel roller to apply the patch to the surface of the roof. The steel roller applies even pressure over the roof patch as it is passed forth and back across the patch and it allows you to press any trapped air out from under the repair patch. It is recommended that you apply a bead of EPDM lap sealant around the leading edge of the patch to provide additional protection against water infiltration.
Non-Pressure-Sensitive Roof Repair Patch
If you are using a repair material that does not have a pressure-sensitive backing you will be required to use a single-ply EPDM adhesive to adhere the patch to the roof surface. The adhesive must be for sealing EPDM to EPDM and not yellow glue which is used for sealing EPDM to substrates or insulation board. Apply the adhesive to the underside of the membrane patch and the surface of the area to be patched. Allow the adhesive to flash off until it is no longer tacky to the touch. After the glue has flashed off you will carefully mate the patch material to the surface of the roof. Once applied, use the steel roller to roll the entire patch to make certain that it has properly mated to the existing EPDM roof membrane. It is recommended that you apply a bead of EPDM lap sealant around the leading edge of the patch to provide additional protection against water infiltration.